
Installation instructions for WATER-STOP in swimming pools
General conditions for installation
Waterproofing work must not be carried out when weather conditions may be detrimental, in particular when it is snowing or there is snow or ice on the substrates, when it is raining or the surface to be treated is wet.
Nor should work be carried out when the ambient temperature or that of the substrate exceeds the limits recommended for each product by its manufacturer (see individual product data sheets).
In the event of interruptions to the work, the materials must be adequately protected.
Before commencing or resuming the installation of WATER-STOP, it must be checked that the substrate meets the necessary conditions set out in section C. If not, the necessary time must be allowed to elapse or the substrate must be brought up to standard.
The WATER-STOP membrane must be protected by placing panels in traffic areas to prevent any foot traffic over the membrane until the permanent protection is in place.
Work schedule
The proposed sequence is the one we generally consider most suitable, but the sequence that best suits the installation conditions will be the most appropriate:
- Inspection and preparation of the substrate.
- Preparation and treatment of penetrating elements.
- Layout, cutting and marking of the WATER-STOP membrane sheets.
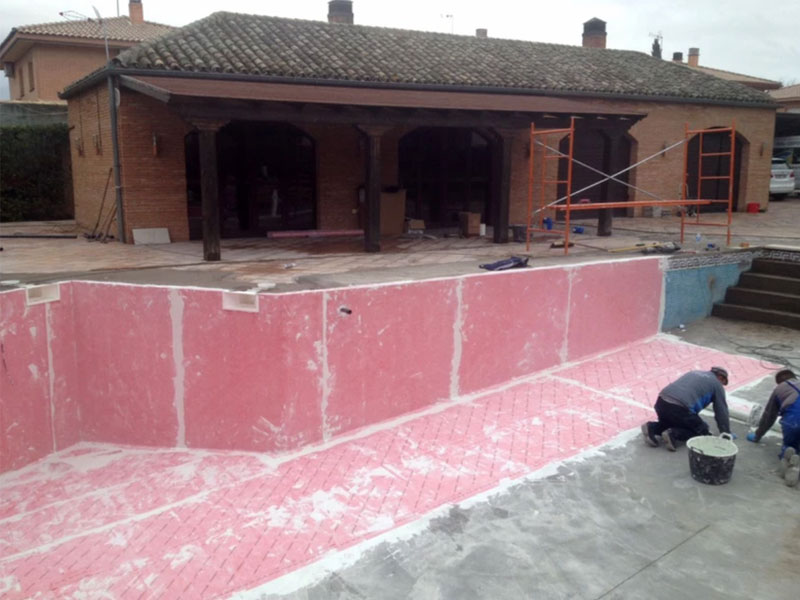
- Application of WATER-STOP to the walls.
- Sealing of joints and reinforcement treatment at specific points on walls.
- Fitting the wall cladding.
- Application of WATER-STOP to the base.
- Sealing of joints and reinforcement treatment of specific areas on the floor.
- Fitting the floor covering.
Substrate conditions and preparation
It is the installer’s responsibility to check that the conditions comply with the following: The surface of the substrate must be completely smooth and even, fully set and dry, free from pits, holes or potholes, edges or protrusions greater than 1 mm, and free from foreign matter. The flatness tolerance is 5 mm when measured with a 2-metre straightedge.
- C.1. Check for subsidence or differences in level, lack of cohesion or cracks.
- C.2. In the case of installation on existing substrates, inspect the substrate by means of a visual examination and, where appropriate, by listening for hollow sounds to determine which areas of the existing covering are to be retained, treated or removed. Check for subsidence or differences in level, lack of cohesion, cracks, poorly bonded or broken pieces.
Proceed then with its preparation. Repair and reinforce using a suitable structural repair mortar. If the existing cladding is to be retained, prepare it by plastering, levelling and surface treatment, applying a primer if the type of substrate requires it.
Carefully remove any dust immediately before installing WATER-STOP.
Treatment of penetrating elements
Before treating connections to drains, inlets, skimmers, outlets and other penetrating elements. The waterproofing must be reinforced at the opening and around the component for a width of approximately 15 cm. To do this, create a reinforcement piece on site using WATER-STOP membrane as follows:
- Cut the necessary pieces of WATER-STOP to the dimensions and shapes suitable for the component to form a lining on the inside of the opening, if possible, and a piece that covers the front and extends around it by approximately 15 cm.
- First, apply the inner part of the opening by bonding the piece with WS BUTIL sealing tape, with an adhesive and sealing compound such as W-S MASTIC, or with waterproof, elastic cement. Press firmly, taking care to remove any air trapped underneath.
- Next, apply the front piece, fixing it in the same way as in the previous step. Using a craft knife or scissors, make several cuts from the centre outwards until you reach the perimeter of the opening, fold the piece inwards into the cavity and stick it down.
Note: This system requires particular care, as during the curing time of the adhesives, any stresses or movements that could damage the watertight seal must be avoided.
- When positioning the main membrane over these reinforcements, before bonding it in place, mark out and cut a hole as close as possible to the element and much smaller than the quadrant. Use adhesive sealant or waterproof, elastic cement to bond the membrane to the reinforcement.
- Once the general installation is complete, the membrane is finished off where it meets the embedded components. The edge of the membrane in contact with plastic or metal must be sealed with an epoxy sealant suitable for use in swimming pools.
Approach
The membrane sheets are laid out and cut to the required size and shape to cover the surface, allowing for the upstands where the floor meets the wall and the wall overlap onto the floor. The areas where the membrane meets specific points and penetrating elements are marked out and prepared.
Installation of the membrane
As the formation of the waterproofing membrane using WATER-STOP is the most important element of the waterproofing system, great care must be taken during its installation.
The sheet is bonded to the substrate across its entire surface. The waterproofing membrane is formed by joining WATER-STOP sheets together. When working on a section where structural elements are present, proceed as indicated in section D.
-
Installation of the membrane on walls
The membrane on the walls must overlap the floor by at least 10 cm.
Corners and angles are fitted by cutting towards the apex and bonding the sheet to itself using W-S MASTIC-type sealant or W-S BUTIL.
To minimise the number of joints, it is advisable to lay the membrane using the full 2-metre width for the height of the wall wherever possible (maximum 180 cm plus the overlap at the top and the joint at the crown).
If the walls are installed first to protect the floor, bear in mind that the membrane to be installed on the floor must extend up the walls by at least 10 cm beneath the membrane on the walls; therefore, the bottom 10 or 15 cm of the walls should not be bonded at this stage.
The top edge should preferably be overlapped beneath the coping stones. If this is not possible, the edge of the membrane must be carefully sealed with epoxy sealant suitable for use in swimming pools.
-
Installation of the liner on the pool floor
The liner at the bottom must extend up the walls by at least 10 cm.
Corners and angles are fitted by cutting towards the vertex and bonding the membrane to itself using a sealant such as W-S MASTIC or W-S BUTIL.
-
Creating steps
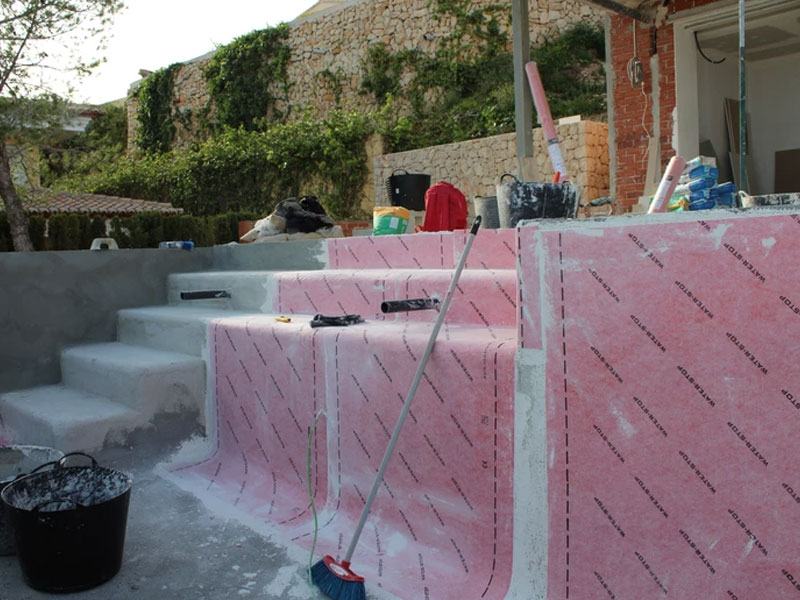
The steps are formed using a single piece of membrane that covers the steps like a carpet.
On the walls, the membrane for each step should extend by about 10 cm, upwards from the tread and forwards from the riser, forming a sort of skirting board. A cut must be made at each vertex to allow the membrane to be folded.
If a joint is required between sheets, it should be positioned at the bottom of a step and overlap onto the tread.
The sheet metal on the staircase walls is also cut at each corner to fit the shape and overlap horizontally and vertically over the tread and riser. This overlap is sealed as indicated in section Hl.
Fixing the sheet to the substrate
To fix the sheet to the substrate, use a cementitious adhesive (tile adhesive) classified as type C2 in accordance with standard UNE EN 12004, preferably a flexible type (TE S2) and suitable for the substrate.
In the case of certain substrates (such as old ceramic tiles), it may be necessary to use a primer to improve the adhesion of the tile adhesive to the substrate. It is important to check that the manufacturer specifies the suitability of the tile adhesive for the type of substrate in question or, where applicable, to use the associated primer recommended by the manufacturer.
The tile adhesive is applied to the substrate using a notched trowel with a minimum tooth size of 4 x 4 x 4 mm. Generally, the approximate coverage is 2 to 2.5 kg/m².
The manufacturer’s instructions must be followed when preparing the adhesive mortar.
- Position the first section of the WATER-STOP membrane to be installed. Align the membrane precisely and pull gently to ensure it lies flat.
- Roll it up or fold it back to clear the area of the substrate where you will begin applying the adhesive.
- Next, apply the adhesive in sections, returning the membrane to its position to bond it by pressing down with the smooth side of the trowel towards the edge, taking care to remove any air trapped underneath.
- Apply the subsequent sheets using the same procedure.
- The procedure for fixing the sheet is the same for both floors and walls.
To make installation easier when working with 2-metre-wide sheets on the floor:
- Position the sheet and spread it out evenly. Lift one side edge and fold it back on itself halfway across the width of the sheet to clear the area where you will begin applying the adhesive.
- Then apply the adhesive, spreading it in sections and returning the sheet to its position to bond it in place.
- Once it has been bonded along its entire length, lift and fold back the other half of the width and proceed in the same way.
- Once the installation of the WATER-STOP waterproofing membrane is complete, proceed to bond and seal the joints between the sheets.
Joints and overlaps between sheets.
Joints between sheets, both on floors and walls, are preferably made as butt joints and covered using W-S BUTIL and W-S 14 TAPE.
Each strip is laid edge-to-edge with the adjacent one, without overlapping. The joints are covered with a strip of W-S BUTIL, and the W-S 14 TAPE is positioned centrally over the butyl.
The sheets must be laid in such a way that no joint between sheets in each section is aligned with other joints.
The joint-covering tape and any overlaps must be bonded and sealed after the membrane has been laid over the entire surface.
Although not the preferred method, the joint-covering strip may also be bonded and sealed watertight using other means:
- Single-component or two-component elastic waterproof cement (see Note)
- W-S MASTIC adhesive and sealing compound or similar (see Note)
As the bonding is not immediate, it is advisable to maintain pressure on the area whilst the adhesives (mastic or cement) set, and any stresses or movements that could damage the watertight seal must be avoided.
Joining with W-S SUTIL adhesive sealing tape
- If necessary, remove dust and dirt from the membrane using a stiff brush.
- Place the W-S BUTIL tape over the joint with the protective paper facing upwards and apply pressure to it using a silicone hand roller or the smooth side of a trowel to expel any air that may be trapped underneath.
Note: Pressing by hand is not sufficient; it does not provide enough even pressure to seal the joint properly. A roller or other hard, blunt object must be used to apply pressure.
- Position the W-S 14 STRIP centrally over the tape.
- Remove the protective paper by pulling from one end at a right angle, moving steadily and keeping the paper flush with the sheet to prevent air bubbles from forming. Smooth the entire length of the joint with your hand as you remove the paper.
- Press down on the joint with a hand roller over the tape and along its entire length, first across and then lengthways.
- Approximately 5 cm of the W-S 14 TAPE on either side of the joint will remain unstuck; these should then be sealed by bonding them to the sheet using C2 adhesive.
- When joining sheets of waterproofing tape, the next roll must overlap by at least 25 mm.
- Overlaps on the floor and on steps are sealed in the same way: with W-S SUTIL applied to the inside of the overlap and finished with adhesive mortar.
Jointing using elastic waterproof adhesive.
- Prepare the waterproof adhesive following the instructions provided with the product.
- Using a trowel or brush, apply the adhesive, spreading it in a layer 1 to 2 mm thick over the area to be covered with the tape.
- Cover with the strip and press down with the trowel or float towards the edge to remove any air and ensure even adhesion.
- Spread the material protruding from the sides of the tape, or add more material if necessary, to form a 1 mm thick sealing layer over the edges of the bonded joint, taking care to smooth it out and avoid leaving any raised areas.
- The estimated coverage is between 200 and 350 g per linear metre of tape.
Joint using W-S MASTIC V-seal adhesive mastic
- Prepare the nozzle by cutting it to produce a bead diameter of 3 or 4 mm
- On each side of the joint line between sheets, apply a bead of mastic and a second bead slightly closer to the outer edge of the area to be covered with the tape.
- Apply another bead between them in a zigzag pattern to maximise the contact area.
- The beads must be continuous; in the event of breaks or interruptions, resume the bead line from 1 cm beforehand.
- Cover with the strip and press down with the trowel or spatula towards the edge to spread the material and ensure even adhesion.
- Spread out any material protruding from the tape or, if necessary, apply a bead of sealant to form a sealing layer over the edge of the already bonded joint, then smooth it down with a damp finger.
- The estimated coverage is 5 to 6 linear metres of overlap per 290 ml cartridge.
Other methods of joining
Although not the preferred method, joints between sheets can also be created by overlapping them in the direction of the slope, so that each sheet overlaps the previous one by between 5 and 10 cm.
The bonding and watertight sealing of the overlaps between WATER-STOP sheets can be carried out using the same methods described for the joint-covering tape.
Checking critical points
Finally, all critical points are checked and the seal is reinforced using W-S MASTIC-type mastic, W-S BUTIL or waterproof cement if used in the installation, applying, where necessary, patches made from offcuts of the WATER-STOP sheet itself and W-S DEX and W-S DIN corner pieces.
The seal where the membrane meets the coping, the reinforcements for penetrating elements and all joints is checked and secured.
Corners and angles are reworked by patching over the vertices and covering any folds or cuts from the previous installation.
Where steps meet the wall at 90° angles, these joints are patched using W-S DEX external corners on the projecting sections and W-S DIN internal corners on the recessed sections.
In addition to steps, these corners are also used at perimeter corners and edges, on the upper edges of infinity pools, and at the junction of the pool floor and wall where they form regular 90° angles.
The sealing of the membrane’s transition to the coping, to any penetrating elements and at all joints is checked and secured.
Tiling and commissioning.
Once the sealing at critical points has been checked and secured, the cladding is installed directly onto the membrane. Use a C2-grade adhesive (according to standard UNE EN 12004), preferably a flexible type (TE S2) and suitable for use in swimming pools.
Wait at least 24 hours before grouting. After grouting, carry out a final sealing of the joints at penetrating and embedded elements.
Wait 5 days before filling the swimming pool.